Determining your write offset
In order to determine the Write samples offset for your CD burner, you will need to create an Offset Test CD. You'll use this CD to measure the combined read/write sample offset correction using any drive with a known read sample offset correction (it doesn't have to be the same one you used to burn the test CD). Once you measure the combined read/write offset correction you calculate the write samples offset by subtracting the read offset correction.
If you have AccurateRip installed and are using EAC V0.95, you will need to temporarily remove the file, AccurateRip.dll, from the EAC directory before starting EAC. If you're using V0.99 you can disable AccurateRip in the Offset / Speed tab on the Drive Options dialog box.
Follow these simple instructions to find your write offset:
 |
Insert a blank CD-R or CD-RW disc in this drive.
 |
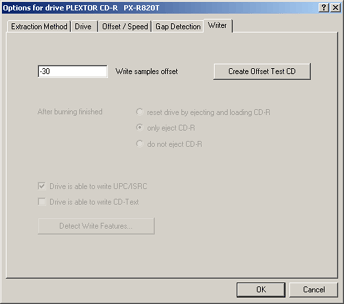
The Drive Options dialog box for your CD burner should now appear. You can verify that you have selected the correct drive by the displayed name in the title bar. Click on the Writer tab.
 |
Next, click the Create Offset Test CD button.
A warning message appears informing you that EAC will actually write data to the disc.
 |
EAC will now begin creating the offset test CD and a dialog box will appear indicating the progress and time remaining.
 |
Once this has finished, the CD should automatically eject and reload in order to reset the drive.
If you know the read offset correction of the burner you just used to create the test CD, just select the Offset / Speed tab, provided options dialog for this drive is still open.
If you don't know the read offset correction of the drive you just used to create the offset test CD, close the current Drive Options dialog box by clicking either OK or Cancel (it doesn't matter since you haven't configured anything yet). Eject the newly-created test CD and insert it into a drive with a known read offset correction. After inserting the disc, select this drive using the top left drop down box (just as you did in the beginning). Next, choose Drive Options... from the EAC menu or press F10 and then click on the Offset / Speed tab.
 |
Click the Detect read sample offset correction... button
If this button is grayed-out, you will need to temporarily disable AccurateRip, as mentioned at the top of the page.
An Analyzing dialog box will popup showing the status of the read offset detection process.
 |
Do not click Apply - you already have the correct value entered!
You only need this new value to calculate the write offset. The number is actually the Combined read/write sample offset correction value for the drive you used to burn the test disc and drive running this test (+649 in our example). In order to arrive at the Write samples offset for the drive you used to burn the test disc, you need to subtract the previously known read offset correction.
To calculate the Write samples offset:
write samples offset = combined read/write offset correction - read offset correctionfor our example:
write samples offset = 649 - 679 = -30
Now go back to the Writer tab on the Drive Options dialog for the drive you used to burn the test CD.
 |
Click the OK button to finish.
You are now able to make 100% offset corrected duplicates of audio CDs!
Note: It is sometimes impossible to have a 100% perfect duplicate of a CD, even when using offset correction. The problem is the overwriting capability of the burner. If the drive is not able to overwrite into the Lead-In (for a positive write offset) or into the Lead-Out (for a negative write offset) these offset samples will always be null.